Introduction – How Our Beliefs Shape Our Conversations
Peter Liljedahl is a former high school mathematics teacher who has kept his research close to the classroom. He opens his book by recounting an experience observeding the class of a middle school math teacher, Jane. She was widely regarded as a good teacher, and had lots of experience. She usually taught according to a familiar routine: go over homework, demonstrate a new technique, assign a “now-you-try-one” question, review the question and its answer, assign homework, and provide time to get started on it.
Sound familiar? Liljedahl visited many classrooms of well-regarded math teachers and found more or less the same thing. The teachers demonstrated techniques and the students practiced those techniques. The approach “worked” in that by the end of the year, most students were able to pass their standardized tests, but it did not “work” in that the teachers were doing the vast majority of the work, and, while the students were busy, they were spending almost no time thinking. He found that most students were just mimicking the worked problems the teachers put on the board. Others were faking it or stalling while doing something else. This imbalance is worrisome. Thinking is a necessary precursor to learning. If students aren’t thinking, they aren’t learning. But the norms we’ve come to expect in math classes – teachers stand while students sit, teachers write on vertical surfaces while students write on horizontal ones, and more – were based on the premise that students either can’t or won’t think. It’s as if we’ve given up and have designed math classrooms to support an environment where students don’t have to think. This needs to be disrupted.
So Liljedahl decided to research and work with more than 400 K-12 mathematics teachers who wanted to increase student thinking. They examined everything math teachers do in the classroom – from how they arrange the furniture to how they grade to how students take notes – and then figured out which practices that would have a measurable impact. After field testing each one, they found 14 teaching practices which increased student thinking. He shares these practices in his book. In the summary, you can expect to find the 14 practices described along with suggested small steps for moving toward them.
If you’re concerned your students are not doing enough thinking to achieve the deep learning you desire for them, then this book has the practical next steps you (or your math teachers) need.
Teaching Practice 1: Give Thinking Tasks
If you want your students to think, you need to give them something to think about. You give them a task. You probably already give them tasks all the time, but the vast majority of tasks given in the math classes Liljedahl observed promoted not thinking, but mimicking, recalling, and rehearsing procedures the teacher had already demonstrated.
If you have taught students a method for solving the problem you give them, then they aren’t problem solving. They’re mimicking your method using different numbers. Problem solving is what people do when they don’t know what to do. Problem solving is messy and non-linear. Students get stuck, and as they get themselves unstuck, they learn how to think, and they learn about math.
In order to encourage your students to think, you need to assign tasks that promote thinking (not mimicry). You need to give them problems they have not been shown how to solve. Wait…you just give them a problem and expect them to solve it even though you’ve never shown them how? Won’t students just complain they don’t know what to do? Won’t some of them give up? Yes, yes, and yes.
But there are ways to address these challenges. Once you do, your students will accept that thinking is expected in your class. Here’s how to start: begin each lesson with a highly engaging non-curricular task: a task that doesn’t map directly to the curriculum and:
- draws students in and entices them to think
- has a low floor, in other words, there is a comfortable point of entry for all learners to engage with the task
- has a high ceiling, in other words, there is room for extension and complexity
- has an open middle, in other words, there are multiple ways to approach the problem and arrive at the correct answer
These tasks should be so engaging that students cannot resist thinking about them. You can find sample non-curricular tasks at https://www.peterliljedahl.com/teachers. Here’s a primary example: How many rectangles are in the figure below? (It’s NOT 16!)
As this becomes routine, students are primed to expect this type of thinking from themselves. “Giving up” and “waiting to be shown how” decrease. For most classes, beginning with this type of task for three to five days is enough to shift the students’ expectations.
Ok, but…what about the learning standards? Can you really prioritize these highly engaging non-curricular tasks with all the curriculum you have to get through? Yes, as an opening activity for three to five days. It is imperative that your students learn to think and expect more of themselves in mathematics.
After three to five days, once all your students are used to problem solving, then you can change how you use curriculum tasks. However, you can’t use your typical curriculum task as it is, or it will promote mimicry. For example, if you asked students to solve 3.1 + 5.2 you would likely show them the steps and then they would mimic. Instead, to turn it into a thinking task follow these steps:
Steps to Turn a Curricular Problem into a Thinking Task | What This Would Look Like for 3.1 + 5.2 |
(1) Ask a question about prior knowledge | (1) Teacher: Let’s review. Students, “What does 3.1 mean?” Student: This is a number more than 3 but less than 4... |
(2) Ask a question that is an extension of prior knowledge | (2) Teacher: Is it closer to 3 or 4? Student: It is closer to 3. Teacher: OK, and what do you know about how large 5.2 is? Student: It is a number between 5 and 6, closer to 5. |
(3) Ask students to solve without telling them how | (3) Teacher: If we were to add 3.1 and 5.2 what whole numbers would the answer be between and which number is it closer to? |
You can turn almost any curriculum task into this type of thinking task with the steps above. Once you present the thinking task, resist the urge to show them how to complete it. These thinking tasks should have multiple ways to approach the problem. If you tell them how at this point, then student thinking ends and mimicking begins.
Word of Caution: If you skip the three to five days of highly engaging tasks and begin with thinking tasks based in your curriculum, only some of your students will get on board with problem solving and some will be left in the dust.
Here, some teachers ask…but isn’t mimicking good? Don’t we want students to learn how to do things correctly? The answer is, mimicking is good for learning to do something in a certain way (like in a fire drill) but beware that mimicking is addictive. Students will come to expect it. In his research, Liljedahl found that students who were mimicking believed that was what they were supposed to be doing. If you want them to be thinking, then you need to demonstrate that expectation consistently by giving them thinking tasks.
Teaching Practice 2: Use Randomization to Form Collaborative Groups
You probably already use groups in your classroom and know the research that collaboration has a powerful impact on learning. Often, elementary teachers create strategic groups with educational or social goals in mind. Secondary teachers more often allow students to form their own groups. In both scenarios, however, 80-90% of the students in groups do not engage in collaboration or thinking. They stick to passive roles. When asked if they are going to offer ideas or problem solve, they say things like, “Probably not. I’m with Gabriel and Aisha and they’re the brainiacs,” or “No way. That’s Deja’s job. I’ll just follow.” Just 10 to 20% of students are accustomed to taking the lead in groups, and the remaining 80-90% just follow along. This is not a thinking classroom!
Some teachers try to prevent this by assigning everyone a role (timekeeper, recorder, etc.) and having those roles rotate on different days. However, this leads to students focusing on their roles and even less on collaborative thinking and problem solving.
Through their research, Liljedahl and the teachers he worked with used experimentation and careful monitoring of the results to determine the best way to form groups to promote thinking: randomly. That is, the opposite of strategic or self-selected.
Here are the best practices they discovered for forming random groups that think collaboratively:
- Use a method that is visibly random. It’s essential that students see the randomizing happen so that they believe it. One method is to have students draw a playing card from a deck as they enter the room. Fours work together, Jacks work together, etc.
- Tell students where to go by posting a labeled map or in some other way make clear which group is to meet in which location.
- The optimal sizes are groups of two (for grades K-2) and groups of three (for grades 3-12).
- Regroup regularly. For secondary teachers who have a new class each period, this means every day. The research showed that active and passive roles in the group started to solidify after about one hour. Avoid this!
So, what are the benefits of the daily (or hourly) randomized grouping of students? In his research, Liljedahl found there was a greater enthusiasm for math class; a decrease in lateness, absences, and social stress; and more students contributed more ideas to the group work (While about 20% of students said they would contribute an idea to their group under old methods of teacher-chosen or self-chosen groups, almost 100% said they would contribute an idea in the new random groups).
Some teachers are concerned that by using random groupings, they’ll lose the opportunities for differentiation by not ability grouping students. You don’t stop differentiating in thinking classrooms, but it will look different (more on that in teaching practice 9).
With these randomized groups you might find that students’ abilities look different. Some students who were weak at mimicking might be strong when it comes to thoughtful problem solving, and thoughtful problem solving might be a weakness for those who were good at mimicking. When students engage in true problem solving, the skills they need are different than the traditional good-student skills. Sitting quietly, taking notes, and following directions are less useful. Self-reliance, perseverance, communication, and patience are now in the starring roles.
Teaching Practice 3: Use Vertical Non-Permanent Work Surfaces
You’ve formed new random groups for today, you have a highly engaging non-curricular task, but what workspace would best support student thinking? Liljedahl researched this very question. Should students sit or stand? Should they write in notebooks, on chart paper, or on dry-erase boards? Should the writing surface be vertical (wall-mounted) or horizontal (flat on a table)?
There was a clear winner: students standing around a vertical, non-permanent work surface (such as a dry-erase board) was measurably better than the alternatives for time on task, eagerness to start, discussion, participation, and persistence. Why is this so?
There are probably a lot of reasons. Easy erasability encourages risk taking and just trying things. Standing up tends to increase mood and energy. It’s a more active and engaged posture. Sitting on the other hand, causes students to feel anonymous which leads to “zoning-out” more frequently. Vertical work surfaces make the groups’ work more visible. It’s better for communicating and idea sharing, and everyone is more likely to stay on task.
Vertical non-permanent work surfaces were also a winner when it came to knowledge mobility. This refers to the opportunity for groups to get a glimpse of what other groups are doing (because now their work is visible) and get inspired! This isn’t the same thing as cheating or copying, which Liljedahl says he saw extremely rarely in thinking classrooms. Knowledge mobility helps groups get unstuck by noticing that others are trying something different. Knowledge mobility is good when engaging in true problem solving.
Teachers also benefit from vertical work surfaces because they can see what groups are doing, who’s on task, who’s on the right track, and who’s stuck or headed in a faulty direction. This increases teachers’ ability to provide feedback or scaffolding where it’s needed.
Okay, so all of these vertical dry-erase boards sound great, but what if your classroom doesn’t have that? And really, whose does? You probably have one vertical board and maybe eight groups of students. How’s that going to work? Teachers have found lots of ways to get creative here. You can use a chalkboard, a window, a vinyl shower curtain, or something else vertical that is easy to erase.
Once you’ve ditched the norm of students sitting and working in notebooks and have your students at vertical non-permanent work surfaces, there are a few supporting strategies you can use to equip groups for collaborative thinking:
| Giving each group only one marker encourages them take turns writing (“Who hasn’t had a turn yet?”) or use a timer to get them to pass the marker along. Eventually, marker sharing will become automatic. |
| The rule “whoever has the marker can only write other people’s ideas” improves communication, ensures the group moves at the slowest learner’s pace, and prevents quick thinkers from taking over while everyone else watches. |
Letting Them Erase (Their Own Ideas) | Freedom to erase is key to encouraging risk taking. On the other hand, talk to students about respecting others’ ideas and not proclaiming someone else’s approach “wrong” and erasing it without permission. |
| Hold the group accountable for every member’s learning. In other words, the problem is not considered “solved” unless every person in the group can explain how it was solved. |
Teaching Practice 4: Defront the Classroom
You’ve got a handle on thought-provoking tasks, randomized grouping, and erasable, vertical work surfaces, but what else will prime your classroom for thinking? Would you believe the way you arrange the furniture impacts the thinking in math classes!?!
Good news for teachers whose classrooms never look Pinterest-worthy: The best classrooms to get kids thinking are not the cutest and most organized. Really. Liljedahl explains that classrooms with color-coded, matching labels, and everything in its place, were some of the toughest to get students thinking and solving problems. The trouble is that this level of organization communicates that learning in this space will be orderly and precise. Whereas real learning and thinking is often messy, non-linear, and requires risk taking.
Classrooms most conducive to thinking are neither too organized nor too chaotic. They are safe, relaxed spaces where risk taking and failure are allowed, but not so chaotic that mess is a distraction or a hindrance. Besides finding a balance between order and chaos, you can do one more thing with the room to send the clear message students will be thinking here: move away from a classroom with a front (where the teacher lectures and students are passive) to a classroom that is “defronted,” where students think and collaborate.
Defronting To-Do List:
___ Cluster the desks together and have the chairs face various directions
___ Move around the room as you talk to the students instead of lecturing from one spot
___ Relocate front-of-the-room indicators like the projector, interactive whiteboard, and teacher’s desk if you can
Defronted classrooms also impact teacher behaviors. Teachers talk less in defronted rooms. They demonstrate less. They circulate more, spending more time facilitating discussion and answering students’ questions. Environments speak loudly and clearly. Defronted classrooms tell students they are expected to think and to engage with one another.
Teaching Practice 5: Answer Only Questions That Keep Students Thinking
Teachers typically answer somewhere between 200 and 400 questions per day. Most of these questions are not helpful in getting students to think and take up way too much teacher and student time. Why bother creating a true thinking task if you’re going to answer students’ questions about how to solve it? Yes, some student questions actually inhibit their own thinking.
Liljedahl’s research found that students really only ask three types of questions. First, they asked “proximity questions” when the teacher circulated near them, not because they needed the answers, but simply as a demonstration that they were on task and properly inhabiting their role as a student. Next, stuck students asked the teacher to do their thinking for them by answering a question that would allow the students to stop thinking (“How do we do this?” or “Is 5 the answer?”). Liljedahl calls this a “stop-thinking question.”
Finally, the one type of question that actually moves thinking forward is a “keep-thinking question.” This is when students asked for information to help them move forward, keep thinking, and keep working (“Should we also try answers that aren’t whole numbers?”).
To promote student thinking and learning in your classroom, you should aim to eliminate answers to proximity (they waste everyone’s time) AND stop-thinking questions (they rob students of the opportunity to learn from their groupmates and grapple with challenges themselves). Train yourself to answer keep-thinking questions only – these open the door to more student thinking.
| | | Recommended Ways to Respond |
| Questions asked when the teacher approaches (not by raising a hand) | To reaffirm their role as on-task students when you walk near them | • Smile (to make it clear you heard them) and walk away. • When you approach groups, ask them a question right away (“Interesting, can someone tell me about this drawing?”). • Keep your distance for the first few minutes of work time. |
| Students checking if they’re on the right track, or asking the teacher to think for them (“How should we start?” “Should we multiply these?” “Is this right?”) | To end or reduce student work or thinking | • Smile (to make it clear you heard them) and walk away. • Respond with your own question (“Can you show me how you got here?” “Are there other possibilities?” or “What do your group members think?”). • Tell them you aren’t going to answer but provide encouragement. (“I’m not going to answer that, but I think if you keep going you can answer it for yourselves.”) |
| Requests for clarification or permission to move ahead (“Are we supposed to consider negative values?” “Can we get the next question now?”) | To get unstuck and keep working | • Give a hint that will allow them to keep working productively. • Answer the question in a way that will allow them to keep working productively (without providing excess detail or help). |
Incredibly, keep-thinking questions account for only about 10% of total questions that students ask. If you answer only these and avoid other question types, you will save a lot of time (yours and the students’), and you will greatly increase student thinking.
Teaching Practice 6: Explain Tasks Mostly Aloud with Students on Their Feet
One of the most frequent questions teachers ask the author is, “Where can I get good tasks?” The internet has abundant resources for thinking tasks (nrich.maths.org and illuminations.nctm.org just to name two). So, why does he get this question so much? He suspects that what teachers really need is guidance about how to make the tasks effective in their classrooms. In reality, the subtle practices of when, where, and how tasks are given are as important as the tasks themselves. This section is about assigning the task.
When? Assign the task early: within the first 3-5 minutes of class. There are two reasons for this. One is that this is when students’ potential energy, thinking, and engagement is highest. If you spend the beginning of class doing something low energy like reviewing homework, then inertia will kick in and students may never reclaim their energy. The other reason is that the more time precedes the assignment of the task, the more likely the teacher is to preteach some aspects of the task, thus reducing student thinking.
Where? Assign the task with both teacher and students on their feet, loosely clustered together. Standing activates core muscles and increases blood flow. Sitting, on the other hand, is associated with passivity and non-thinking behavior. High school students were also far more likely to look at their phones while sitting at their desk than they were while standing.
How? Explain the task mostly aloud. Typically, teachers of older students give tasks in writing, but research demonstrates that tasks spoken aloud produced more deep thinking and fewer questions. This was true of students at every age, and in classes with many English language learners, too. There was no context in which providing the task in writing produced better results.
Keep in mind, the task should be given mostly aloud. The teacher should explain the essence or the nature of the problem but put the details on the board – things like the quantities, measurements, geometric shapes, data, long algebraic expressions, etc.
Teaching Practice 7: Rebrand HW as “Check-Your-Understanding Questions”
Math homework simply doesn’t help. You probably knew that without Liljedahl’s research, but he confirms this as well. Rather than using math homework as a way to safely practice and make mistakes as they check their understanding, it has become something kids mostly forget to do, cheat on, and do with help (for completion not learning).
And when kids actually do it on their own, they tend to mimic what was done in class, or just complete it for the grade, rather than think. To create a thinking classroom you will need to rebrand homework so that it fosters thinking.
First, students need to understand that the purpose of homework is to check their own understanding. Keep this objective front and center by stopping using the terms “homework,” “practice,” and “assignment.” These words imply a stale routine where the point is to mimic what the teacher did in class and “get it done” because the teacher said so. Instead, use the name “check your understanding.” For example, “Ok, here are today’s check-your-understanding questions.”
The check-your-understanding questions are for the student, not for the teacher. Communicate this consistently by telling the students it is their chance, their opportunity, to make sure they understand. You should not check it either for accuracy or completion, and you should not grade it or make it “count” in a point system. Instead, provide students with the opportunity to check their own work by giving them the answers at the same time as the questions. Fully worked solutions should be provided too, but only after students have had time to work (for secondary students this might mean posting full solutions online in a few days).
Teaching Practice 8: Foster Autonomy Among Students
In a thinking classroom, your students must take on greater responsibility for their learning. This means they must learn to be more proactive and rely on you less. The more you micromanage student actions, the less they think. The key to discouraging their reliance on you is to encourage their reliance on one another (autonomy through interdependence). When groups work on vertical surfaces (like walls) while standing they can quite literally turn to one another for guidance. This isn’t the same thing as cheating, which Liljedahl says he saw extremely rarely in classrooms that had implemented practices to promote thinking. This is knowledge mobility.
When groups are stuck, they can get help by noticing that others are trying something different. Knowledge mobility is good when engaging in true problem solving. You will probably need to tell your students explicitly that observing and even talking with other groups is allowed. Of course, everyone in a group still needs to be able to explain the group’s solution so copying work won’t accomplish that. Also, you’ll need to make clear that finding help to get unstuck is allowed, but copying and goofing off are not.
You will also need to model what knowledge mobility looks like. Do this as you provide scaffolding to groups. Instead of giving every answer or hint yourself, strategically point the students to one another. Be deliberately less helpful so that instead of being the sole source of knowledge in the room, you mobilize the knowledge that’s all throughout the room. Encourage them to passively observe one another sometimes and to interact or ask each other questions at other times. Here’s what this kind of encouragement sounds like:
“Group 7 has the same answer as you, but your work looks totally different. What do you notice when you look at their work?”
“Your group and group 3 are doing some similar work but arriving at different answers. Talk to them and find out why.”
“That’s a good question, and I think group 2 just figured out something that might help you answer it. Try asking them.”
“Look around the room. I see some groups using ratios. Can you think how you might try a ratio here?”
These suggestions will feel countercultural if you and your students are used to a more traditional classroom but think about how closely they resemble the way that work takes place among adults. Autonomy through interdependence is a skill for real life.
Teaching Practice 9: Build and Maintain Flow
If you’re starting to get nervous about all the curriculum and standards there are to cover and you’re hoping this problem-solving stuff can help you with that, then this is the section for you. Teaching Practice 1 promises that after 3-5 days you can move from highly engaging non-curricular tasks to curricular problem-solving tasks. Teaching Practice 9 is about how you take curricular problem-solving tasks and teach them in a differentiated way that keeps kids engaged and thinking.
In building a thinking classroom, engagement is key, that is, we want our students to experience “flow.” Perhaps you’ve heard of Csíkszentmihályi’s concept of “flow” – the state in which you are so involved in what you’re doing that it’s like nothing else matters, and what you’re doing feels worth doing for its own sake. It’s the pinnacle of engagement. Research shows three things must be present to create flow: 1) clear goals, 2) immediate feedback, and 3) the right balance of ability and challenge. Hopefully with the changes so far, the goal of tasks are clear and students are getting immediate feedback when standing and problem solving in groups.
In order to stay in a flow state, people need a task that is challenging, but not exceedingly so. If the task is way too challenging, this leads to frustration (and sometimes disengagement). If the task is too easy, this leads to boredom (and sometimes disengagement).
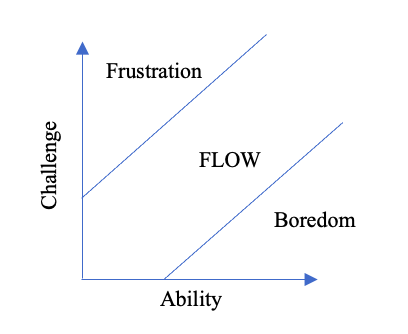
This chapter focuses two ways to maintain flow – giving hints and providing extensions. We can provide extensions to keep some students from being bored (increase the challenge of the task) and hints to prevent others from feeling frustrated.
In a typical math class, we raise the level of challenge at the same time for the entire class or we see students are struggling and we give a hint at the same time to the entire class. In a thinking classroom your students will be working in groups (likely 7 to 10 of them) and you will be able to provide extensions or hints based on where the groups are in their thinking and struggling.
Using Extensions to Maintain Flow: Use a sequence of tasks released one at a time. When students are working in flow their ability increases. Once this happens, we risk them moving into boredom if we don’t increase the challenge level of tasks at that time. To do this, after you introduce a concept to the entire class, have a set of tasks you’ve prepared with only slightly more challenge or that vary only one element at a time, that are released to students one at a time.
For example, you might begin to introduce the concept of solving one- and two-step algebra problems, with everyone clustered and standing, like this: I’m thinking of a number, and I’d like you guess it: If I add 3 to my number the answer is 12. [Once enough thumbs are up, a student shares that the secret number is 9.] Then another question, Ok, I’m thinking of a new number now: If I double my number and then add 3, the answer is 15. [Once enough thumbs are up, call on a student who shares the answer is 6].
After this, the students work in groups to solve a sequence of problems with only one element changed at a time. The teacher observes groups at work, circulating and providing feedback and differentiation as needed to help maintain flow. One way to differentiatite is to simply provide students with the next task when their group has successfully solved the first one (and everyone in the group can explain the solution). This is what a sequence of additional problems that gradually get more challenging might look like:
- ___ + 3.014 = 7.22 (this is the first task the teacher gives to the groups)
- ___ – 15.1 = 7.88 (this one uses subtraction in place of addition)
- ___ x 4.25 = 24.8 (this one uses multiplication)
- ___ ÷ 1.356 = 4.02 (this one uses division)
- ___ x 2.5 + 3.67 = 18.3 (this is a two-step equation)
…and so on
A word of caution here: It might be tempting to provide the entire sequence of tasks so that students can move through them without needing to get the next task from you. Don’t do this. It creates a visible finish line and puts the focus on completion instead of on problem solving and learning. This is an incentive for fast thinkers to speed through the work, leaving slower group members behind. Instead, reinforce the autonomy introduced in the last chapter by allowing groups to “steal” the next task from any group that has it.
Using Hints to Maintain Flow: Some groups may struggle with the task and call you over for a hint. Math teachers have always given hints, but did you know that there are really only two types of hints? There are hints that decrease the challenge or increase the students’ ability level. Even though it takes longer, it is preferable to give a hint that increases their ability level – like reminding them of a strategy. However, remember that the goal is to maintain flow, so you may need to decrease the challenge or give them a partial answer. If this is the case, rather than having the group proceed to the next task in your sequence, you should provide a task at the same level of challenge to solve next. This will mean that you’ll need a list of parallel problems in addition to your sequence.
Using Shifts in the Mode of Engagement to Maintain Flow: One final way to differentiate to ensure students don’t fall into boredom is to make use of different modes of engagement. Rather than just tweaking the task itself, you can change how students engage with it. For example, the typical mode of engagement involves students “doing” a problem. Beyond just “doing the problems” you can ask groups to justify their answers (i.e. prove they are correct), explain their thinking, teach other groups something they’ve figured out, and create additional tasks to trade with other groups. Each of these actions raises the challenge level a step. See the sequence below:
Doing → Justifying → Explaining → Teaching → Creating
The overall idea in this chapter is that it is not enough to simply find thinking tasks, but to truly have a thinking classroom you need to build engaged students, and this involves avoiding boredom and frustration by differentiating to keep students in “flow.”
Teaching Practice 10: Consolidate Learning with Curated Gallery Walks
It’s nice to have the students figuring things out for themselves and really thinking, but when and how do we consolidate learning?
We need to consolidate learning by bringing together disparate parts of the lesson to make them into something cohesive the students can understand and remember. Consolidate learning after the problem-solving sequence. And usually, do it by means of a gallery walk. This takes some preparation before and during the problem-solving sequence as you observe and interact with groups.
Curating the Gallery Walk
Just as the problem-solving tasks build on one another and gradually increase in difficulty, you will also need to consolidate learning in a sequence. Begin with simple understandings and build toward the more complex. Liljedahl’s research demonstrates that this simple-to-complex progression was by far the most effective at keeping all students engaged and learning. Fortunately, you’ve already built the necessary sequence of understandings from simple to complex when you created the task sequence.
During the problem-solving phase, as you observe and support groups, plan and curate a gallery walk of the students’ work. This gallery walk will not necessarily visit every group, and the students will not present their own work. Instead, while you observe, look for the exhibits you need for a focused gallery walk that illustrates the learning you need all the students to see.
Seek out pieces of the students’ work that exemplify each step in the sequence. Carry a red marker and draw a box around work you would like to preserve for the gallery walk. Train students that a red box means “do not erase.” As you clarify your plan, revisit your red boxes and add numbers to indicate the order in which you’ll present them. Think about what you want to say about each one.
If you find that an idea you want for in the gallery walk is not present in student work, you can: 1) Strategically offer hints to students who seem close to it or 2) You may need to demonstrate something that they students don’t have in their work – just keep it short!
Holding the Gallery Walk
In addition to the carefully chosen and sequenced exhibits, Liljedahl determined a few other important features of a gallery walk:
- Students and teacher walk to each exhibit (workspace) in the sequence. Don’t give in to the temptation to photograph student work and turn it into a quick slide show. Slide shows lead to passive, disengaged students.
- The teacher spends the most time explaining and describing the early, foundational steps. Don’t speed through the simpler steps to get to the complex stuff. Spending more time on the foundation helps all students learn.
- The teacher annotates, labels, and marks-up exhibits. Use your red marker to make the students’ work clearer, label things, or emphasize new ideas in whatever way is useful.
Teaching Practice 11: Coach Students to Create Meaningful Notes
During the curated gallery walk, you helped the class consolidate learning. After the gallery walk is a good time to have students process and consolidate their own learning. Here’s where notes come in. Teachers often wonder if students will have any notes to study from if they learn everything through problem-solving. The answer is yes, but they won’t be notes taken in a traditional way. This teaching practice will shift notetaking in your classroom from a passive activity to a thinking activity.
Liljedahl and his co-researchers observed troubling patterns in traditional notetaking. Sometimes teachers provided notes on the board during their lecture for students to copy. This often led to a decrease in listening (not to mention thinking) and ultimately, as one student described, this would lead to a “zombie state” where students mindlessly copy the board. Sometimes, teachers provided fill-in-the-blank notes so students could copy less. Disturbingly, these led to even less listening (and a lot more copying from neighbors).
Another strategy some teachers tried was posting notes online. While this wasted less class time, it didn’t do much for students’ learning. Students benefit from notetaking when it is used as a means to consolidate their own learning, moving them from collective understanding to individual understanding. This is possible when you coach your students to create notes that are meaningful.
Have Students Create Meaningful Notes
When?
Immediately after the gallery walk (or other whole-class consolidation of learning)
Why?
So students can remember how to do this work in the future. Ask the students: “What are you going to write down now so you remember what you learned today three weeks from now?”
Where?
With their notebooks have students move around the room revisiting the information they want to write down for their future, forgetful selves. Discourage them from taking photos. Explain that having a photo in their device’s memory does nothing to help them process or better understand what they learned.
With Whom?
Encourage them to collaborate and discuss what should go in the notes with their problem-solving group.
For Whom?
The notes are for themselves. This means you should not grade or check them.
Teach and Scaffold Methods for Creating Meaningful Notes
Method #1: Select, Create, Annotate
Coach students to select an appropriate math question and create a complete worked example in their notes. And finally, teach them to annotate the worked example using labels and phrases that will help them remember all they need to know about it in the future.
Method #2: Graphic Organizer
Teach students to utilize graphic organizers in their notes. In some cases, you might provide them with a graphic organizer tailored to the day’s learning to guide the content of their notes. This is much looser than fill-in-the-blank notes. It suggests topics or categories and gives a nudge away from the copy-it-all approach by providing limited-size spaces in which to write. Or you could provide (or teach students to draw) a general graphic organizer that could be applied to their learning on any day.
Example of a Tailored Graphic Organizer: |
| |
| |
Example of a General Graphic Organizer: |
| |
| |
After about three weeks, give them tasks to do that require them to draw on what they’ve learned so far. Allow them to use their notes so they can see for themselves how useful the notes are and whether they need more detailed notes next time.
Teaching Practice 12: Cocreate Rubrics for Evaluating Thinking Behaviors
In his research Liljedahl asked teachers what competencies students most needed in order to be successful in thinking classrooms, and over and over he got the same answers. Teachers polled in 50 different settings and across grade levels were unanimous in naming perseverance, willingness to take risks, and ability to collaborate as the three competencies students needed most. If these behaviors are so important in a thinking classroom, then it is our job as teachers to develop them. If we value these skills, then we need a way to evaluate them. We demonstrate to students what we value by what we choose to evaluate. However, unlike assessing math skills, teachers often don’t have tools to measure these types of thinking behaviors.
Liljedahl and his team tested methods for evaluating these skills in the classroom and discovered several best practices – the most common of which was the rubric. But there are some serious problems with typical rubrics. For example, 75% of students spent less than 10 seconds looking at a completed rubric when it was returned. Through tinkering with the traditional rubric, and interviewing students about their understanding of their feedback, the team found ways to make rubrics work better.
Problems with Traditional Rubrics | |
Too Many Achievement Levels. Four or more achievement levels (usually the columns) introduce nuances of language that students (and teachers) struggle to understand. What is the difference between “mostly achieves,” and “sometimes does not achieve?” It’s just too complicated. | Use 2 columns for K-2nd grade. This age group thinks in yes and no, good and bad terms so create a rubric with simple dichotomies: Worked together? (yes or no) Shared materials? (yes or no). Use 3 columns for grades 3-12 but leave the middle column blank. This sets up a continuum. On the left is a brief description of being unsuccessful (“actively excluding others”) and on the right is the brief description of success (“actively inclusive”). A mark between the two means “partly.” |
Too Many Competencies. When we pile too many competencies onto one rubric, it becomes too long and complicated. Teachers can’t observe all of that at once, and students can’t take it all in. | Evaluate one competency at a time. For a given task, announce that you will evaluate perseverance or risk taking or collaboration (not all three). Use a simple rubric designed to focus on that competency only. And evaluate only three groups at a time so you can really observe and evaluate fairly. Evaluate other groups on other days. |
Headings Mistaken for Descriptions of Students. Even with careful language such as “not yet achieving” students frequently misinterpreted the headings as indications of who they were (non-achievers) rather than where they were (at the start of developing a skill). | Get rid of the headings and replace them with an arrow. Moving away from column headings like “partially achieves” and using an arrow instead prompted students to view the feedback as a description of where they were, rather than who they were. |
Created Outside Your Classroom. Rubrics are often created by curriculum publishers or people at a department of education. This contributes to the tendency to use a lot of language and nuance that students simply don’t grasp. | Cocreate rubrics with your students. Lead a discussion about the competencies. For example, ask, “What does really good and really bad collaboration look like?” Group similar ideas together resulting in no more than 5 indicators. The following day, show them the rubric you made with their ideas. |
Sample Collaboration Rubric (Grade 3 or above)
|
| | |
| | |
| | |
| | |
| | |
Implementation: Tell the students you’ll be evaluating three groups using this rubric today and tape the rubric up near the groups’ work areas. Observe during their work time and mark the rubrics near the end. Repeat this with different groups for at least three days to demonstrate its importance to you. Do not sum up your feedback on the rubric with a numerical score or letter grade. The researchers discovered that this switched student attention away from the feedback and onto the grade only. Repeat this process with the other two competencies early in the year. After that, use the rubrics every now and then to show they are still important or for a group that is struggling with a particular competency.
Teaching Practice 13: Provide Students with Navigation Tools to Self-Assess Learning
From his research, Liljedahl found that students who understood where they were in their learning and where they needed to be performed better. It makes sense – think about navigating by land or sea; you need to know where you are and where you’re going in order to get there. The problem in schools is that the teacher knows where students are going – what the whole unit and its subtopics are – but the student, even after getting feedback, doesn’t see the whole picture and doesn’t know what there is still left to learn.
So Liljedahl and colleagues developed something they called a navigation tool (see the example below) to help students understand where they were in their learning. You’ll see that the tool is a chart with the subtopics of the unit listed on the left side. Use the plainest, most student-friendly language you can. Across the top are columns labeled “basic,” “intermediate,” and “advanced” that refer to the challenge level of different problems within each subtopic. This excerpt is from a navigation tool for a pattern unit:
| | | |
Identify the rule for a number pattern | | | 23, 30, 37, … 17, 28, 39, ... |
Fill in the blanks in a number pattern | 2, __, 6, 8, 10, … 4, 8, __, 16, … | 1, 4, __, 10, … 8, __, 18, 23, … | __, 16, 22, … 3, __, 17, … |
| | | |
When students get formative feedback on a quiz or test that is organized in a table like this, they can see which subtopics they need help with and which skill levels (basic, intermediate, advanced) they need to work on. In Liljedahl’s work, when students got feedback in this format they finally understood what they needed to improve, “I mean, now I know exactly what I need to work on,” and they finally understood how a unit was broken into subtopics, “Are you kidding me? This is great. I know what we are doing now.”
With the navigation tool, between 50% and 70% of the students saw a 10% to 15% increase in their assessment performance.
For older students, the entire problem might not fit in one box in this chart, so teachers can use the problem number from the textbook or other source. First you would give a navigation tool to students for a unit of study and teach them how to use it. Tell them the purpose of the tool is to help them see where they are and see where they are going. After they work through the problems, give them a code they can use to mark how they did on each:
✓ = answered correctly
G = answered correctly working with a group
H = got help from teacher or peer
S = silly mistake
X = attempted but answered incorrectly
N = not attempted
Below is an example for older students along with their own self-assessment of how they did. Navigation tools give students the power to accurately assess their learning and see what exactly they still need to learn. This is an excerpt of a navigation tool for fractions (the numbers refer to question numbers on a handout):
| | | |
Add and subtract proper fractions | | | |
Multiply and divide proper fractions | | | |
Multiply and divide mixed fractions | | | |
Teaching Practice 14: Approach Grading as Data Gathering
So, we now have a good idea how students can self-assess their learning and also an idea for how teachers can evaluate thinking skills like collaboration, but what about teachers evaluating student learning? What’s the best way to do that in a thinking classroom?
There are two common grading paradigms teachers work from: point gathering and data gathering. The point-gathering paradigm consists of giving points for defined events (homework, a unit quiz, a final test, etc.). A grade is calculated by determining the percentage of points earned out of the points available. This is a traditional and common grading method, and many consider it to be “objective,” but it is also rife with problems and not necessarily objective. For more about objective grading and problems with traditional grading methods, see The Main Idea’s summary of Grading for Equity by Joe Feldman (Corwin, 2018).
The data-gathering paradigm, on the other hand, consists of evidence collected by the teacher indicating whether the student has learned. The data gathering paradigm allows for teachers to include additional data other than from traditional tests, quizzes, and assignments. Teachers can choose to include observations during groupwork or a conversation the teacher had with the student as evidence that the student has learned. In addition to relieving some of the problems caused by the point gathering paradigm, data gathering is a good fit for the groupwork orientation of the thinking classroom approach.
Recording Learning Data
When you grade using the data gathering paradigm, you’ll keep records differently. Instead of a gradebook listing assignments or other point-worthy items along with students’ scores as a fraction or percentage, you’ll shift to listing the learning goals for your unit of study. It works well to set up one page for each student that lists the learning goals and allows space for the teacher to note evidence of goal attainment. It is similar to the navigation tool, but it’s for the teacher to record evidence rather than the student to self-assess.
Excerpt of a student record page for fractions unit for a student named Alicia:
| | | |
1. Add and subtract proper fractions | | | |
2. Multiply and divide proper fractions | | | |
In this example, the teacher records evidence that this particular student, “Alicia,” successfully demonstrated a skill. ais for a successful demonstration. H is for success with help, N is “not attempted,” and X is “incorrect.” If needed, the teacher could also add subscript “c” to note that the evidence was from a conversation, or subscript “o” to note that it was from an observation. This chart could be interpreted as “Alicia is able to add and subtract proper fractions independently. She is developing her ability to multiply and divide proper fractions, but she needs support on more advanced problems.”
Calculating Grades
If the teacher’s district requires a points-based grade, the teacher could add two more columns on the right side of the chart for “points available” and “mark” (or score earned). The teacher would then assign a point value to the achievement of each learning goal. This is NOT the number of assignments or opportunities to demonstrate mastery. Rather, it represents the value of attaining the goal. The “mark” or score earned is a representation of how completely the goal was attained.
Sample excerpt of a student record page for fractions unit, with the addition of columns for numerical points:
| | | | | |
1. Add and subtract proper fractions | | | | | |
2. Multiply and divide proper fractions | | | | | |
Above, the student attained the first goal and got full points because she demonstrated each skill level successfully multiple times. It does not “count against” Alicia that she received help with her early attempts at advanced addition and subtraction problems – that is expected – and after she successfully completed advanced problems independently, so she gets full points. The second goal is not quite fully attained, so Alicia earns a mark of 3 out of 4 possible points. She did not demonstrate independent success with advanced multiplication and division problems. To calculate a grade, divide the total “marks” by the total “points available.”
What About Tests?
So, if we grade with the data-gathering paradigm, do we still give tests? You certainly can, though you might do some things differently. The data-gathering paradigm allows flexibility that the point-gathering paradigm does not. Here are some examples:
If a student has already demonstrated mastery of all the learning goals prior to the test, you don’t need to require them to take the test. If another student has demonstrated mastery of several learning goals (or levels) prior to the test, you could have them complete only certain problems or sections of the test. If one of your other students has terrible test anxiety or is absent on test day you could have them meet with you and show what they can do and then use this as the evidence you need in place of the test.
When the question is “Did I see the student demonstrate this learning?” then there are far fewer limits on how exactly tests, assignments, and so on need to work. You can make them work in service of students’ learning instead of in service of the gradebook.
Conclusion
When Liljedahl began his research, he believed that encouraging more thinking in mathematics classes was all about finding the right thought-provoking tasks for students. But he discovered there was a lot more to it. We need to create classroom cultures where thinking is both valued and required. This led to developing the 14 teaching practices which work best when introduced in order.
In cases where the teacher is changing established norms in the classroom, research points to this sequence as most effective:
- Practices 1, 2, and 3 introduced together
- Practices 4, 5, 6, 7, and 8 introduced next (either together or in any order before moving to Practice 9)
- Practices 9, 10, and 11 introduced one at a time, in sequence
- Practices 12, 13, and 14 also introduced one at a time, in sequence
Teachers should be aware that Practices 7, 10, 11, and 13 have a special function: enabling students to transfer collective knowing and doing to individual knowing and doing. If you implement only Practices 1-3, for instance, then some students will perform well during group work but not on individual work later on. The combined use of the consolidation method in Practice 10, the meaningful note-taking in Practice 11, the check-your-understanding in Practice 7, and the navigation tools in Practice 13 are what students need to transfer their success in the group to success when working alone.
Once you have all practices implemented, here’s what your class sequence will look like:
| | | | |
| Manage flow during groupwork | | Students create meaningful notes | |
If your class period is less than 65 minutes, this sequence might sometimes need to be split over two days, with a bit of time to consolidate learning at the end of day 1.
When all 14 teaching practices are combined and implemented effectively, they create the best possible conditions for learner-centered mathematical thinking and learning. With knowledge of these practices, you and educators everywhere now have the power to build the thinking classrooms that students deserve.
